
Tank Guide [Extremely long and detailed]
- Welcome to the PBS GAMETEAM's website, WE ARE RECRUITING , JOIN FOR FREE!. JOIN US and get a FREE VIP slot on our servers! -
- Do you like our servers or site? Support us on this page -
- Do you have a question? contact us -
- Join our Discord! -
- Check our latest news about our PBS games on this link -
- Would you like to donate for our servers? Please check this link -
- We are the best HLL, ARMA, BB, RS2, MW3 community out there! Sign up today! -
- Like us on Facebook! -
- Like us on Twitter! -
- We have many new wars! Check and signup here pls -
- Join our latest community event #here! -
- This topic has 11 replies, 1 voice, and was last updated 4 years, 9 months ago by
 Fafis.
-
AuthorPosts
-
-
29/10/2020 at 22:47 #54995
Hello fellas,
I found extremely detailed and up to date tank guide. If anyone is up to some bedtime story – give it a try. 🙂
If someone hates reading here is compact version:
– German Light Tank “Luchs” is only against infantry
– Always try to shoot the rear or side of the enemy tank hull(body) and avoid tracks
– Always aim to shoot flatest possible surface of the enemy tank that is perpendicular to your cannon
– AT Deployable cannons have the same damage as Medium Tanks, but much faster reload time with a gunner than a tank
– Dont drive on road and save yourself a headache .. “they” are everywhere -
30/10/2020 at 13:07 #55039
Good share, I have (attempted to) read that guide before. Great summary Dee!
-
30/10/2020 at 13:14 #55040
Nice one thanks 🙂
-
31/10/2020 at 14:16 #55169
Had no idea about the slit on the sherman, explains the times I have one shot shermans from the front without knowing how lmao, amazing find
-
31/10/2020 at 14:21 #55170
this find is literally gold, any aspiring tankers/AT this info right here is invaluable, i see so many try and pen the front of a tiger with a bazooka til i tell them xD
-
01/11/2020 at 01:11 #55180
Nice one thank you 👍


-
04/11/2020 at 13:54 #55462
The Tank Bible
Everything You Need to Know About
Tanks in Hell Let Loose
Compiled by [EASY] Doc
Last updated September 15th, 2020
1 Â Â Introduction
Why does it take a trillion shots to kill that enemy tank? Why did I just get 1 shot by that Tiger? Why did daddy go out for a pack of cigarettes and never come back? All of these questions and more are answered below. This small scale study is a compilation of statistics observed through testing how various tanks react when getting absolutely pummeled by other tanks. The purpose of these stats is to update any existing knowledge on tank damage values and tank tenacity prior to Update 7, to inform any tank players of the damage their tanks do to other tanks and why, to expose players to some new and interesting discoveries pertaining to new tank strategies, and to advise said tanks players on the best methods for dealing with enemy tanks. Some readers may already know some of the information stated below, but there will likely be many of you that might find these statistics interesting.
2 Â Â Findings That Apply to All Tanks
There are some aspects of tank gameplay that are shared between every tank in the game. These are shared below.
2.1 Tank Health Bars
Every tank has three health pools, shown near the bottom middle of the screen. These show the status of each individual part of the tank, and whether it is damaged or disabled. The first health bar is the turret’s health bar. When hit by enemy fire that penetrates the turret, the turret’s health bar will go down, and when the health bar reaches 0, the turret is severely hindered. The turret’s coaxial machine gun is disabled and the traverse speed (meaning the speed to turn left and right) of the turret is also severely reduced. The next health bar is the armor/hull. This health bar signifies the overall health of your tank’s armor and can be considered the overall health of the tank. If this bar goes to 0, the tank explodes in a ball of flame and you die. Finally, the third health bar is the tracks. This shows the functionality of the tracks, and when the health bar hits 0, your maximum speed is reduced to first gear and the turning speed of the tank itself is severely reduced as well. Note that both tracks share 1 health bar, so shooting either of them (or both) will damage the track health bar. When you hit a tank in any region that causes damage to 1 or more of these health bars, you will see sparks flying out of the hole you just made.
        The important thing to note here is this: some tanks, as we will see later, can take upwards of 10 shots to the tracks before they explode. Despite this, the tracks are always disabled after 2 shots. The same is true for the turret. Sometimes the turret is completely disabled in 1-2 shots, however you may still find yourself alive and able to shoot back. This exposes potential value in quickly disabling systems of an enemy tank before trying to go for the kill. For instance, given the fact that a Tiger tank can kill every Sherman tank in the game with 1 shot (as we will see below), and if it has not spotted you yet, it may be advantageous to shoot a Tiger tank’s barrel/turret to disable it before engaging. This makes the Tiger slow to acquire your tank as a target, and lets you get 1-2 more shots in before certain death.
2.2 Barrels of Fun
Every tank in the game has a barrel through which the projectile is fired towards an enemy, and this barrel can be similarly fired upon by that enemy. When you hit an enemy tank’s barrel, it’s turret almost always becomes immediately disabled (meaning that the coaxial gun is offline and the traverse speed is slowed) and sparks start flying out of the barrel. Sounds good, right? Wrong. In every instance that has been tested and compiled here, while shooting the barrel does do damage to the turret quickly, it does NOT do damage to the hull, and therefore cannot kill the tank. As a result, you should never hit the barrel more than once, and even hitting it once is situational. Typically, as you will see below, you will want to avoid the barrel when aiming for the turret.
2.3 BBW: Big Bouncing Warheads
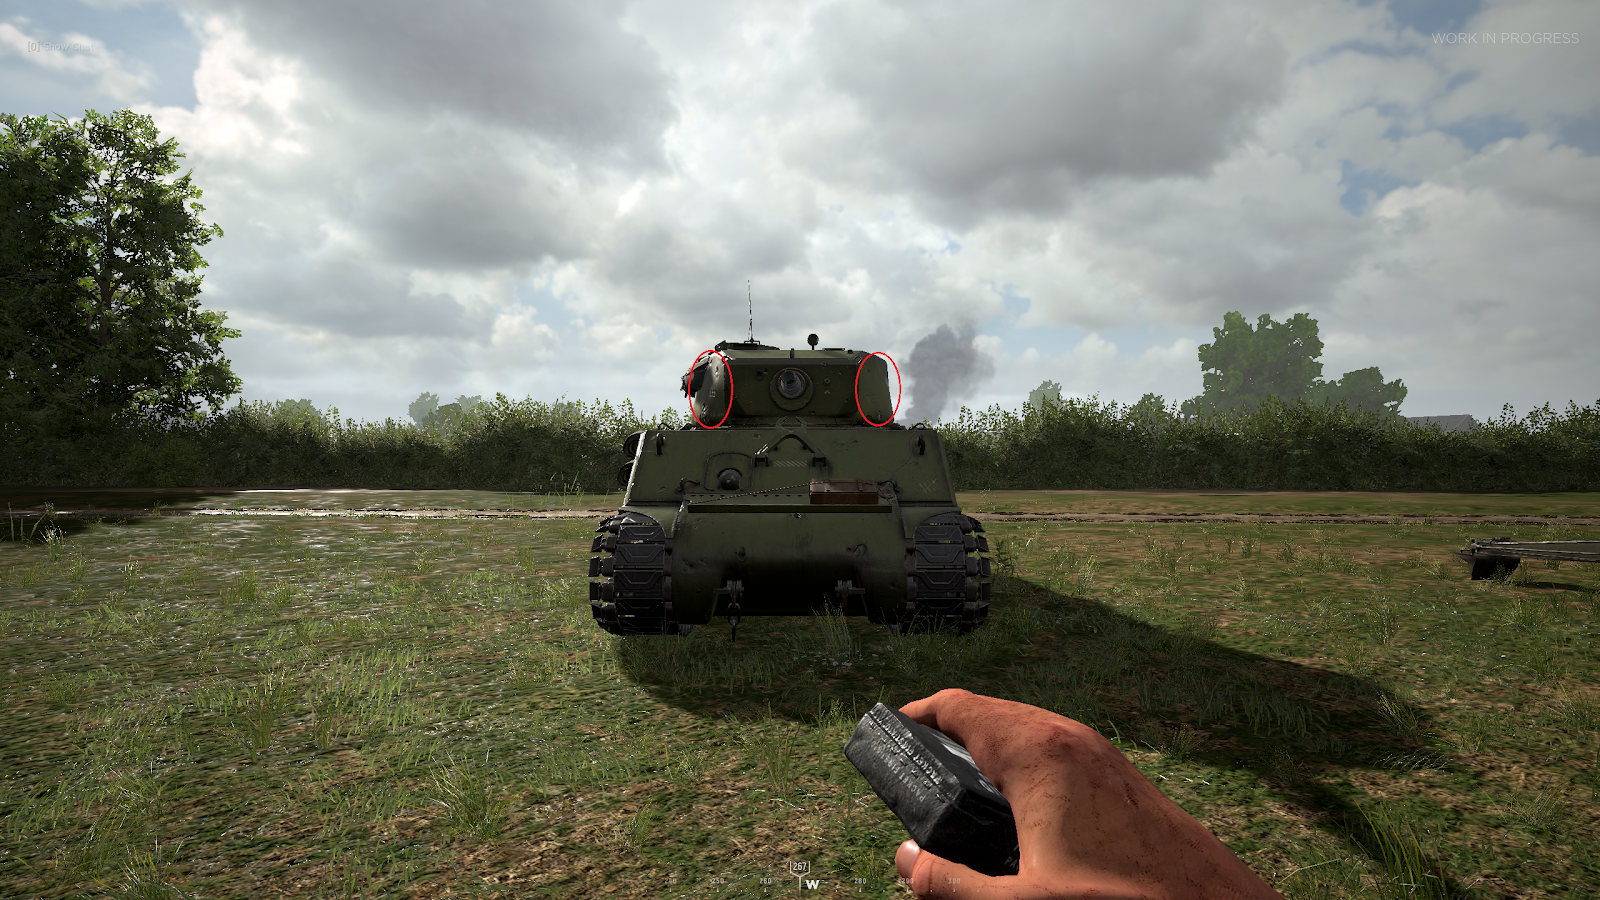
So what is a ricochet anyways? A Ricochet is when the projectile you fire from your tank bounces off the hull of an enemy tank instead of penetrating. In terms of the game, ricochets mean that your shots do no damage. Instead, the projectile is redirected somewhere else and may land somewhere nearby. Ricochet physics in Hell Let Loose are perhaps the single biggest reason why most tank crews are not as efficient as they could be at killing tanks. To understand how and why a tank round ricochets, it’s important to know the factors that are at play. The critical ricochet angle, meaning the angle at which a tank round will ricochet as opposed to penetrating, depends on the velocity of the projectile, the thickness and hardness of the plate on the tank, the shape of the projectile, as well as other factors. For the purposes of Hell Let Loose, however, all you need to know is that the bigger tanks tend to sling faster shells with greater penetrating power, but they also have thicker and harder plates to boot. So, in general, if you are facing a tank with really hard armor such as a Tiger, most if not all of your shots to any surface that isn’t directly facing you will ricochet. On the other hand, if you are a tank whose projectile is fast and hits hard, it may be okay to hit armor at an angle as it will penetrate anyways. The most important thing to learn about ricochets is avoiding slanted surfaces. This may seem obvious,  but typically you should aim for surfaces that are perpendicular to the projectile you are firing. For example, all Sherman tanks have a flat surface on the turret on either side of the barrel. When a Sherman tank is looking directly at you (such as during a tank firefight) those plates will be perpendicular to any projectile that you fire on them (Figure 1).
Figure 1: “Where to shootâ€
If instead you fire on the slanted plates to either side of the front plates, your shot will very likely ricochet and do no damage (Figure 2).
Figure 2: “Where not to shootâ€
More information on the exact metrics of ricochets are described in the individual tank sections below. The last helpful tip for ricochets is that you can both see and hear when a round you fire bounces. That round will not create a sparking effect (as when you penetrate a piece of the hull), and it will create a unique audio effect that sounds something like a large barrel being hit with a mallet (or similarly, a drum).
2.4 Muzzle What?
A lot of real life tanks use a barrel that features a muzzle brake on the end of it as opposed to simply a straight cylindrical barrel. The purpose of the muzzle brake is to funnel the gasses that come out of the barrel to either side of it when a round is fired instead of directly in front of the barrel. This (in theory) makes for better visibility as well as less recoil and a variety of other things on top.
        This is all well and good, but how does it pertain to the game? Well, in a general sense, tanks in Hell Let Loose that have a muzzle brake tend to have smoke trails that dissipate almost immediately. Conversely, if a shot is fired through a barrel that does not have a muzzle brake visibility can be lost for a few moments. For the Americans, the Sherman “Jumbo†75mm and the Sherman Medium do not have muzzle brakes, and they tend to leave a smoke cloud that obscures the spotter’s vision for about 2 seconds. Note that the gunner for some reason does not see this smoke cloud, and that the smoke completely dissipates before said gunner can fully load the next round for fire. The Sherman “Jumbo†76mm however does have a muzzle brake, and does not have to deal with this issue. On the German side, both the Tiger tank and the Panther tank have smoke screens that block the gunner’s vision for 2 seconds, but if the gunner zooms in during this time the visual can be reacquired.
        Because all the gasses of a tank shell come out of the end of the barrel, it is important to note that friendly (and enemy) infantry can be suppressed by your shells in a radius around the end of your barrel. For Americans, all tanks suppress within 5 meters of the end of the barrel, and for Germans, all tanks suppress within 7 meters of the end of the barrel. As infantry that is pushing behind or to the side of a friendly tank, you can use the body of the tank as cover from the suppression of the muzzle even if you are within the radius of suppression, as long as you keep the body of the tank between you and the muzzle (this is easier to do on German tanks because they are larger).
2.5 My Drivers Always Fall Asleep at The Wheel
Let’s talk about driving, because some of you can’t seem to figure it out. All of the tanks mentioned here are stick shift operated, meaning that you have to control the switching of gears of the tank as your speed changes. Typically, the lower gears turn quickly and the higher gears move the tank faster. Although obvious to some of you, if you switch gears too slow you can stall the tank and get stuck at a slow speed even if you switch to higher gears. In order to avoid this, many people wait until the tachometer is at maximum and then switch to the next gear and repeat, but this can be done in a much faster way. Note: The sensitivity of the gears is dependent on the tank you’re driving, but I find that in Hell Let Loose it actually depends on the category of tank you are driving (Light, Medium, Heavy). The heavier your tank, the easier it is to stall.
        So here’s the technique: rev up first gear until it is roughly at 12 O’Clock. Then shift all other gears up one after the other as fast as you can. By the time you get to fourth gear, you’ll be barely over the threshold of stalling but you will never stall and instead speed up. Sometimes this technique can be tried even earlier than 12 O’Clock on the first gear, but you can experiment with this. Note also that when stopping the tank, you need not slow down before shifting the gear down. You can simply slam the “S†key to stop and hold “Ctrl†to shift all the way to park with no adverse effects.
        Another very important aspect of driving is knowing the size of your tank and viewport as a driver. This is the single biggest reason why so many drivers get stuck in urban or forested maps or even when simply trying to make a sharp turn. Because the driver’s viewport is on the left hand side of the tank, not the middle, the tank actually extends farther to the right of the driver than it does to the left. For tanks like the Tiger that are wider than my aunt Bertha, this means you have to be careful how you make your turns. If the right side of your track gets caught on a tree or a wall, your entire tank will pivot into said tree or wall if you keep going forward and thus force you to reverse, wasting time. Note: you can move the mouse downwards to allow greater vision of the ground immediately in front of you, and can be useful in determining what you are stuck on. Awareness of your tank also means awareness of which direction your turret is facing and how long it is as well. Because the Hell Let Loose tank barrels have physics attached to them, they can get stuck on trees or walls if you’re not careful and create unwanted movement in the tank. Note: Moving the tank by moving the barrel against a surface can be really annoying to deal with, but can also be very useful to get yourself unstuck from a ditch or hole.
        The last thing to mention about driving is moving while shooting. This is also dependent on the class and weight of the tank. Generally speaking, the heavier a tank is the more stable it is when shooting from a parked position and a moving position. A Tiger for instance can easily move in 2nd gear and even 3rd gear with enough stability to accurately aim a shot. A “Stuart†light tank on the other hand typically must be stationary to land an accurate shot. This opens up combined arms tactics where a tank slowly moves up as mobile cover for friendly infantry while simultaneously raining death on enemy infantry positions.
2.6 Stormtrooper Aim
If you’ve never seen a tank’s MG firing in Hell Let Loose before, you might think you’re seeing red and green lasers just like in Star Wars. Contrary to popular belief, both the hull MG and the coaxial turret MG are both quite ineffective at accurately killing enemy infantry. Their effective range is about (at maximum) 100m, and anything farther than that is in the hands of RNJesus. That being said, if you can kill an enemy with an MG instead of an HE round, you should absolutely do so, because HE rounds are more valuable and fewer in number.
        So if the MGs aren’t for sniping enemies, what are these things used for? Suppression. Suppression is a powerful tactic to use against enemy infantry in Hell Let Loose as it limits their vision and makes it very hard for them to shoot anything. All tanks in the game have high enough fire rates on their MGs that shooting at and around an enemy position at a constant rate of fire is a really good way to lock down an area and force their infantry to deal with you or move around your zone, both of which hinder their potential push into your territory.\
3 Â Â Anti-tank Shenanigans
Ever stopped to wonder why you spent a full minute making sure there was absolutely no one behind you and as soon as you looked away you got shot? Or why as soon as the map switches to Hill 400 your team goes from 5 full tank squads to 1 solo? Why are enemy infantry more OP than enemy tanks for crying out loud? This phenomenon is what experienced tankers like to call “getting AT’d in the ass†and is how most novice tankers meet their ends on the battlefield.
        Below are the individual damage values of each team’s AT rockets and guns against enemy tanks. Knowing the damage values of each of these off the top of your head will allow you to get a better idea of when you are safe as a tank and when you are in imminent danger.
3.1 The American “Bazookaâ€
The Bazooka is a decent anti-tank weapon that can be devastating in the right hands. The American AT class has two variants–the classic variant and the ambusher variant. The classic variant of the AT class gets a whopping 4 AT rockets and the ambusher variant gets only two but also 4 AT mines. Below are the hits to kill both the Panther and Tiger tanks in each location (note that for the purposes of these charts, R means ricochet or non-penetration):
Location
Panther
Tiger
Front Plate
R
R
Side Plate
R
R
Turret
R
R
Back plate
2
2
Tracks
8
12
As the data above clearly shows, shooting either of these tanks with the Bazooka anywhere except the back plate is not going to net you a kill unless the tank is already substantially damaged. Enemy AT players cannot penetrate either the Panther or the Tiger in the front plate, side plate, or turret. It is important to note two things however:
- Shooting the tracks twice with a Bazooka will disable them (even if only doing miniscule hull damage to the tank) allowing you to effectively immobilize the tank thereby increasing the chance that something more powerful can hit it as well as increasing the chance that you will be able to flank it’s back plate and kill it that way.
- Shooting the barrel of either of these tanks will damage (and enough shots will disable) the turret of the tank, making it easier for you to avoid getting shot while moving towards the back plate flank.
As a whole, only the back plate is a viable option for dealing substantial damage to German tanks with a Bazooka. This fact allows German tanks to be a bit more lenient with their positioning as well as their infantry support as only their rear really needs to be covered.
3.2 The German “Panzerschreckâ€
This bad boy packs a significantly stronger punch than its American counterpart, but the downside is that the German AT class can only have two of these rockets per player at any given time. The classic variant of the German AT class gets 2 shots, and the ambusher variant also gets 2 shots and 3 AT mines. Below are the damage values for the Panzerschreck against American Shermans:
Location
Sherman Med
“Jumbo†75mm
“Jumbo†76mm
Front Plate
2
R
R
Side Plate
2
2
2
Turret
3
R
R
Back plate
2
2
2
Tracks
6
6
6
The Panzerschreck is a more serious threat to all Sherman variants but especially the medium variant. This is because the Panzerschreck can penetrate every part of the tank including the front plate–in other words, all a German AT player has to do is peek out of cover and shoot a rocket in your general direction to do significant damage to the medium. Even if you are ready for him and kill him immediately as he peeks, a lot of times the AT player can still get a shot off. As for the “Jumbo†variants of the Sherman, both tanks fare the same under AT rockets. The front plate and turret are impervious to damage, but most importantly the side is a 2 shot kill (the same as the rear plate). This effectively means that both sides and your back plate are vulnerable spots that you need to have protected by cover or by infantry support thereby forcing you to take more conservative positioning than in the German tanks. Note as well that all Sherman variants take less AT rockets in the tracks to kill than German tanks, meaning that even more surface area is vulnerable. The same two notes mentioned above apply to Shermans as well:
- Shooting the tracks twice with a Panzerschreck will disable them (even if only doing miniscule hull damage to the tank) allowing you to effectively immobilize the tank thereby increasing the chance that something more powerful can hit it as well as increasing the chance that you will be able to flank it’s back plate and kill it that way.
- Shooting the barrel of either of these tanks will damage (and enough shots will disable) the turret of the tank, making it easier for you to avoid getting shot while moving towards the back plate flank.
3.3 Anti-tank Guns
Anti-tank guns are probably the most misunderstood pieces of tank-related armament in Hell Let Loose. Every tanker from level 1 to 100 has an opinion on where to hit enemy tanks, but no one has a clue about where to aim the anti-tank guns. The answer to this mystery is simple: they are functionally identical in terms of damage to their teams’ medium tank variant. That’s right, the 6 pounder American AT gun is equivalent to the Sherman Medium, and the Pak 40 German AT gun is equivalent to the Panther. Below are the hit to kill values for both the Pak 40 and the 6 pounder for reference (even though they are exactly the same as the medium tank values shown further down in this document):
6 Pounder
Location
Panzer II
Panther
Tiger
Front Plate
1
R
R
Side Plate
1
1*
2*
Turret
2
2*
R
Back plate
1
1
2
Tracks
4
5
6
Pak 40
Location
Stuart
Sherman Med
“Jumbo†75mm
“Jumbo†76mm
Front plate
1
1*
R
R
Side plate
1
1*
1*
1*
Turret
2
2
1*
1*
Back plate
1
1
1
1
Tracks
3
4
4
4
Any comments on the effectiveness of either of these guns can be reserved for the respective medium tank sections below. Note that the stars next to the numbers means that this number can be achieved only under specific circumstances.
One big difference between the Pak 40 specifically and the Panther is the sights. The Pak 40 specifically has sights that are above and to the left of the barrel, meaning that for close range targets (within about 150m) you have to aim the crosshair above and to the left of the target area (Figure 3 — the blue circle is where the shot will hit). Longer ranges reduce this effect. That being said, all of the 1 shot opportunities (mentioned in detail in the Panther section below) are still viable for the Pak 40, it just might take a bit of practice to land shots.
Figure 3: “Sight picture of Pak 40 at 100mâ€
So as a tanker, how do you deal with AT guns? In public matches, as mentioned earlier, no one on Earth knows how to shoot these things so usually they will end up shooting your front plate and dealing no damage. Anyone who has read this guide and practiced a little bit, however, will be a challenge to deal with. AT guns are small in size and can be hidden rather cleverly, so you are chiefly going to be relying on your spotter to spot enemy AT guns as they go down or as they try to shoot at you and your friendly infantry on the ground to spot and mark enemy AT gun emplacements. A good way to identify an AT gun when you’re being shot by it is to notice the firing speed. With a loader and a gunner, the AT gun can fire much faster than any tank in the game. If you are consistently taking shots quickly then it is likely an AT gun. Note: AT guns can be killed in 1 shot by any tank’s cannon with both AP and HE rounds.
3.4 Mine, All Mine!
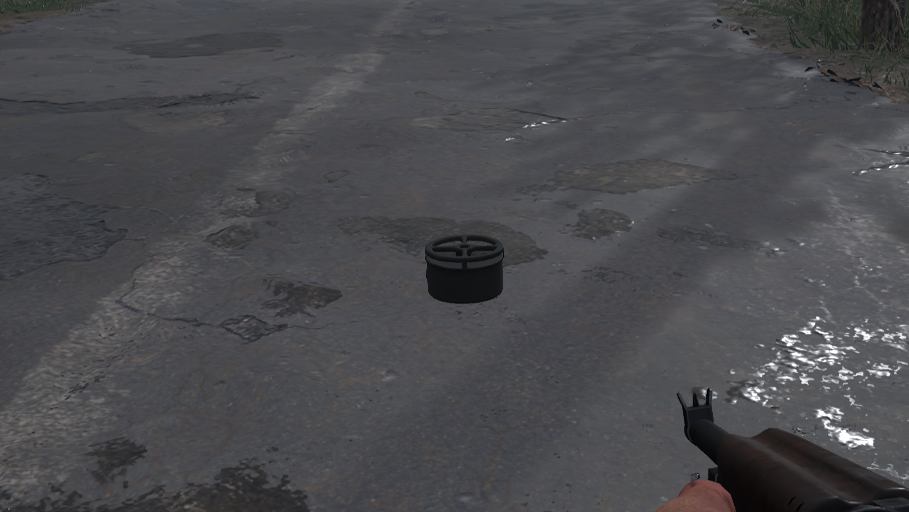
Ah, mines. The bane of every tanker’s existence. They are the reason you just died without a sound in the middle of nowhere, and they can be very disruptive for a team if placed properly. Every tank in the game can be destroyed from a single mine as long as that mine passes under their chassis, and some mines can be hidden in creative ways to make them nearly impossible to see. Below is a picture of each team’s AT mine for reference:
Figure 4: “Tuna can with a steering wheel on topâ€
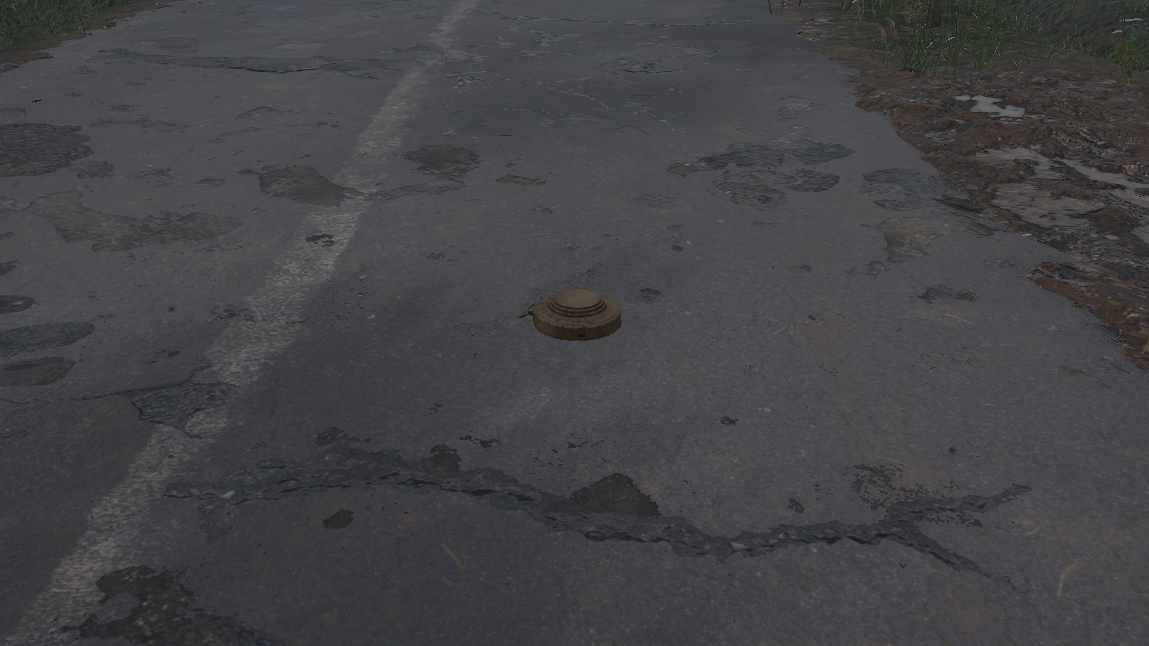
Figure 5: “Pancakeâ€
The American mine looks like a can of tuna with a steering wheel on top of it (Figure 4), while the German mine is known as the “pancake†mine (Figure 5). As you can tell from the pictures, the American mine sticks out of the ground more and is a dark color, meaning that it is easier to spot for the most part than the German ones, especially in muddy environments. Sometimes mines can be exceedingly hard to spot especially while thinking about other things, so tank crews have to be extra vigilant (Figure 6).
Figure 6: “Try to find the mineâ€
There are several ways to protect against death by mine. The first is simple: avoid roads. Most sensible engineers or AT rocketeers drop their mines on a road because that is what is likely going to attract the most traffic. If you avoid roads as a tank it may take longer to get to the objective, but dying to a mine will make you take a lot more time to get to the objective. If you’re not going to be avoiding roads (for instance if you’re playing on a forested map or Carentan) then you have to be on the lookout for mines. Go slow if you have to, but unless you are engaging something both the driver and gunner should both be looking at the road for mines. Once you get good at it, you should be able to spot most mines. Make sure you immediately tell your driver (who should always be ready to stop at once) and make sure there are no friendly infantry nearby when you destroy it (it has a huge blast radius). Lastly, you can also have infantry support push up and sweep for mines on the roads themselves so that you can focus on more important things. This last option is rare and typically is only performed by dedicated tank support squads, but it is an option nonetheless.
3.5 How To Die Less Against Anti-tank
The first step is to learn the above statistics by heart. Yes, I mean it. Knowing the exact damage something does to your tank can help you identify what just shot you before you can visually see it. For example, say as a Tiger you’re minding your business and suddenly you take 50% hull damage from something. The only thing that deals exactly 50% hull damage to a Tiger in 1 shot is an AT shot in the ass (a “Jumbo†76mm shot does more than 50%, for example). Knowing this, you can turn the tank around and save your own life without ever having had to identify the threat visually.
        Another tip is not staying in one location for too long. You may be having a great run killing tanks and infantry in a certain spot, but once you piss off enough people you will eventually start drawing a large amount of unwanted attention. This can mean getting pinged by enemy infantry and therefore increasing the chances enemy tanks can see you before you see them, enemy infantry building AT guns with the express purpose of killing you and you only, or diehard AT hunters whose only purpose in life is to shoot you in the ass. If you move around every so often you can reduce the likelihood of death related to these threats by a surprising amount.
        Probably the most important piece of advice regarding AT is the driver’s observational skills. Obviously it’s the spotter’s job to look around and take notes of all the threats in the surrounding area, including the rear, and good spotters make it easy to respond to threats no matter where they are–but sometimes the spotter is looking at something else when AT is coming behind the tank and it becomes the driver’s responsibility to save the lives of the crew. As soon as the driver knows that a shot has been taken to the rear of the tank, he need not wait for a command or spotter confirmation to turn the tank 180 degrees. Since turning the tank (not running away, for example) is the best way to deal with flanking AT rocketeers, the driver should be ready to take quick and aggressive action. If the driver does not take this action right away, your tank is dead. To help drivers decipher what they were hit from at any given time, here are some tips:
- AT rockets travel much slower than shells of a tank or AT gun, so with enough practice you can learn to hear the time between when the shot was fired and when the shot hits your tank. In addition, AT guns and tanks make a particular sound (more of a loud BOOM) and AT rockets make more of a hissing sound when fired.
- If you are not engaging anything directly in front of you or to the sides, then you can assume the threat is at your rear until your spotter confirms otherwise.
- As mentioned before, specific damage values can be a telltale sign that you are getting shot by an AT rocket as opposed to a tank. Know your hit to kill values.
Lastly, positioning is an important part of surviving AT rockets. Especially on urban maps and forest maps, it is very easy for you to get surrounded because your mobility is severely restricted when compared to the enemy infantry’s. For this reason it is advisable to be near friendly infantry at all times because they will naturally act as a screen for enemy AT rocketeers trying to attack you. Even if the friendly infantry are not a dedicated tank support squad, they will naturally kill any enemy they see (like bots), thus covering your flanks. This strategy has strong bonuses other than flank protection as well, such as the close proximity of engineers to repair your tank as well as the possibility of repair stations, not to mention the fact that you can clear enemy infantry out easily for friendly infantry to push in with you thereby significantly increasing the chances that you can capture or defend a point. Positioning is half the battle in a tank–bad positioning is responsible for 90% of tank deaths, while good positioning is how games are won.
4 Â Â Findings That Apply to Individual Tanks
Below is the meat and potatoes of this study: the stats. All measurements were done using AP rounds, as HE rounds do no damage to tanks, and all measurements were taken by shooting a stationary enemy tank from no more than 50m. This being said, I can confirm beyond a shadow of a doubt that distance does not matter. In other words, no matter how far away you shoot, as long as you land the shot in the right place, these statistics should be accurate.
Note1: for each of the tables below, R means ricochet, and an asterisk (*) next to a number means that there are some exceptions or caveats.
Note2: Several times in the segments below I may mention some parts taking 15+ shots to kill. This is a bit misleading, as I have not actually tested past 15 shots because any competent tank crew would be dead well before expending 15 shots on an enemy tank. 15+ shots effectively means no damage.
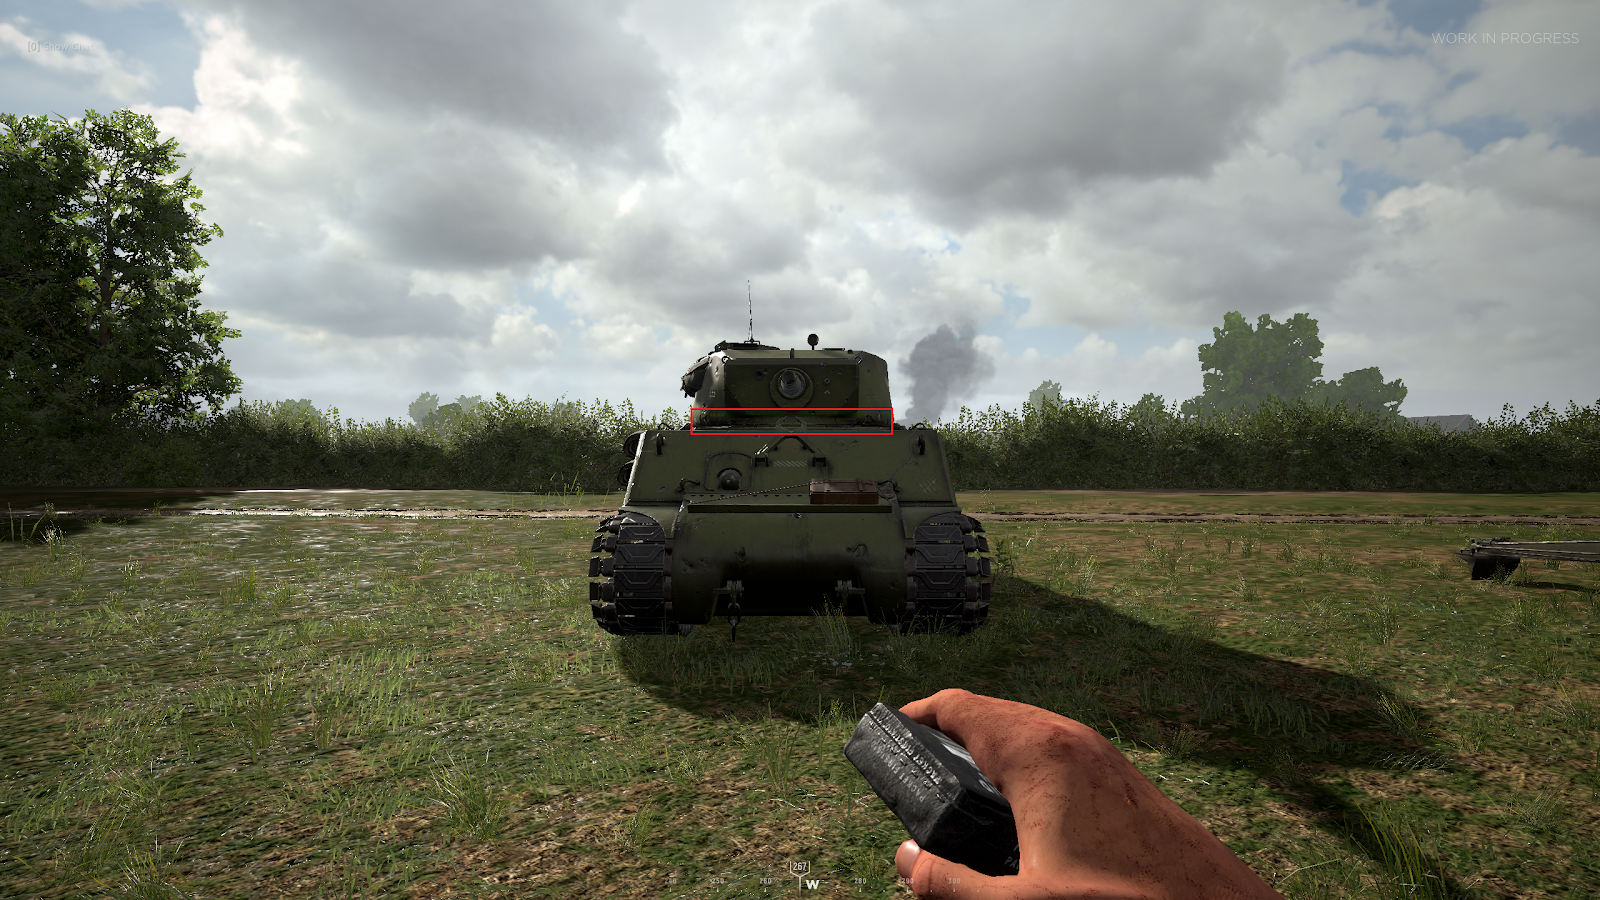
4.1 The Family of Shermans
There are some properties that all Sherman tanks share that can be exploited by the German tanks. One of the biggest weaknesses of this type is what has been named “The Slitâ€, and is the small section of very thin armor in between the front plate and the turret of a Sherman (Figure 7).
Figure 7: “The Slitâ€
Any shot from any tank that lands on this tiny section of the armor will immediately destroy the Sherman in question. It is also possible for tank rounds to ricochet into this slit, but it is very rare. Hitting this slit can be very rewarding, but can also be very hard to do especially at long distances, but perhaps with some practice consistent hits can be achieved. This is an area that needs a bit more field testing by readers.
4.2 The M4 Sherman Medium Tank
The Medium Sherman is arguably the weakest non-light tank in the game, with its strengths lying in maneuverability and speed, and its weaknesses being relatively light armor and a relatively weak gun.
First thing’s first. How do you recognize the Sherman Medium amongst the billions of other types of Shermans? The Sherman Medium has the following features (Figure 8):
- A smooth cylindrical barrel with no muzzle brake on the end.
- Rounded off edges on the front and side body plate.
- A white star on its side armor.
- A bunch of tires, equipment, and other junk on the front, where other Sherman variants do not.
Figure 8: “The M4 Sherman Mediumâ€
The following is the amount of shots it takes to kill enemy tanks of different types when shooting rounds from a Sherman Medium:
Location
Panzer II
Panther
Tiger
Front Plate
1
R
R
Side Plate
1
1*
2*
Turret
2
2*
R
Back plate
1
1
2
Tracks
4
5
6
Based on these statistics, we can extrapolate the optimal place to hit each tank as follows:
When engaging a Panzer II:
- Make certain to hit anywhere in the body, as it is always a 1 shot kill.
- Make certain NOT to hit the tracks or the turret, as this can increase the shots it takes  to kill by up to 4 times.
- Since the Panzer II cannot do any real damage to you in a Sherman Medium, so it is not a foe you should be worried about.
When engaging a Panther:
- Any shots to the front plate will almost always ricochet. This may result in shots bouncing from the hull into the turret, but that is relatively rare.
- Trying to kill the Panther by hitting the tracks is inadvisable, as it takes many shots to do so and the turret takes less shots to kill.
- Hitting the turret is most likely the best approach to killing a Panther whose body is facing you as a Sherman Medium. The trick here is to aim for the surface that is going to be facing your tank round directly, and trying to avoid hitting the turret at an angle. If the Panther is aiming its barrel towards you, those surfaces are the two plates immediately to the left and right of the barrel. If you do hit the turret at an angle, the round will very likely ricochet.
- If you have the opportunity to hit the side of the Panther, care must be taken not to hit the side skirt that extends over the tracks. There is a thin metal plate that when hit counts as a track hit and not a side hit. Instead, you need to hit the slanted portion of the side plate that is above this skirt. Note: because this side armor is slanted, the chance for ricochet is high. In order to penetrate the armor for a 1 shot kill, you must be at an angle less than 45 degrees to the perpendicular of the side armor.
- As with any other tank, 1 shot to the back plate at any angle will kill it. This means that even if you can see only a sliver of the back plate, if you hit it you will kill any tank with 1 shot.
When engaging a Tiger:
- Any shots to the front plate, front of the turret, side of the turret, or back of the turret will very likely ricochet at any angle. Even if the round does not bounce, minimal to no damage will be done to the hull itself. (During testing, it took 15+ non-ricochet rounds for multiple trials).
- If you are lucky enough to be in a position where you see the side armor of the Tiger, 2 shots will kill the tank as long as the projectile lands at an angle less than 45 degrees to the perpendicular of the side armor. A greater angle than 45 degrees will bounce.
- If the Tiger is facing directly towards you so that a side shot is not possible, your only chance to do damage is the tracks. That being said, it will not be a quick endeavor, and seeing as how the Sherman Medium dies to 1 Tiger round anywhere in the body, your best bet when engaging a Tiger head on is to turn tail and run.
- The back plate is a 2 shot kill at any angle. Care must be taken not to hit the side instead of the back plate when aiming for the back plate at a very shallow angle (a good rule of thumb is to hit the two exhaust ports sticking out the back). Because this is the same value as the side, it is not recommended to actively try to get around the tiger to see its back plate. Just hit the side.
Opinion: In conclusion, the Sherman Medium is perhaps best used as an anti-personnel tank with which to lock down an enemy location. While it can hold its own against a Panzer II and a Panther, it does not stand a chance against a Tiger unless it can catch said Tiger off guard. It is outclassed by the heavier tanks, and it is out-maneuvered by the lighter tanks, so it’s role seems to best be suited for infantry control and AOE zoning.
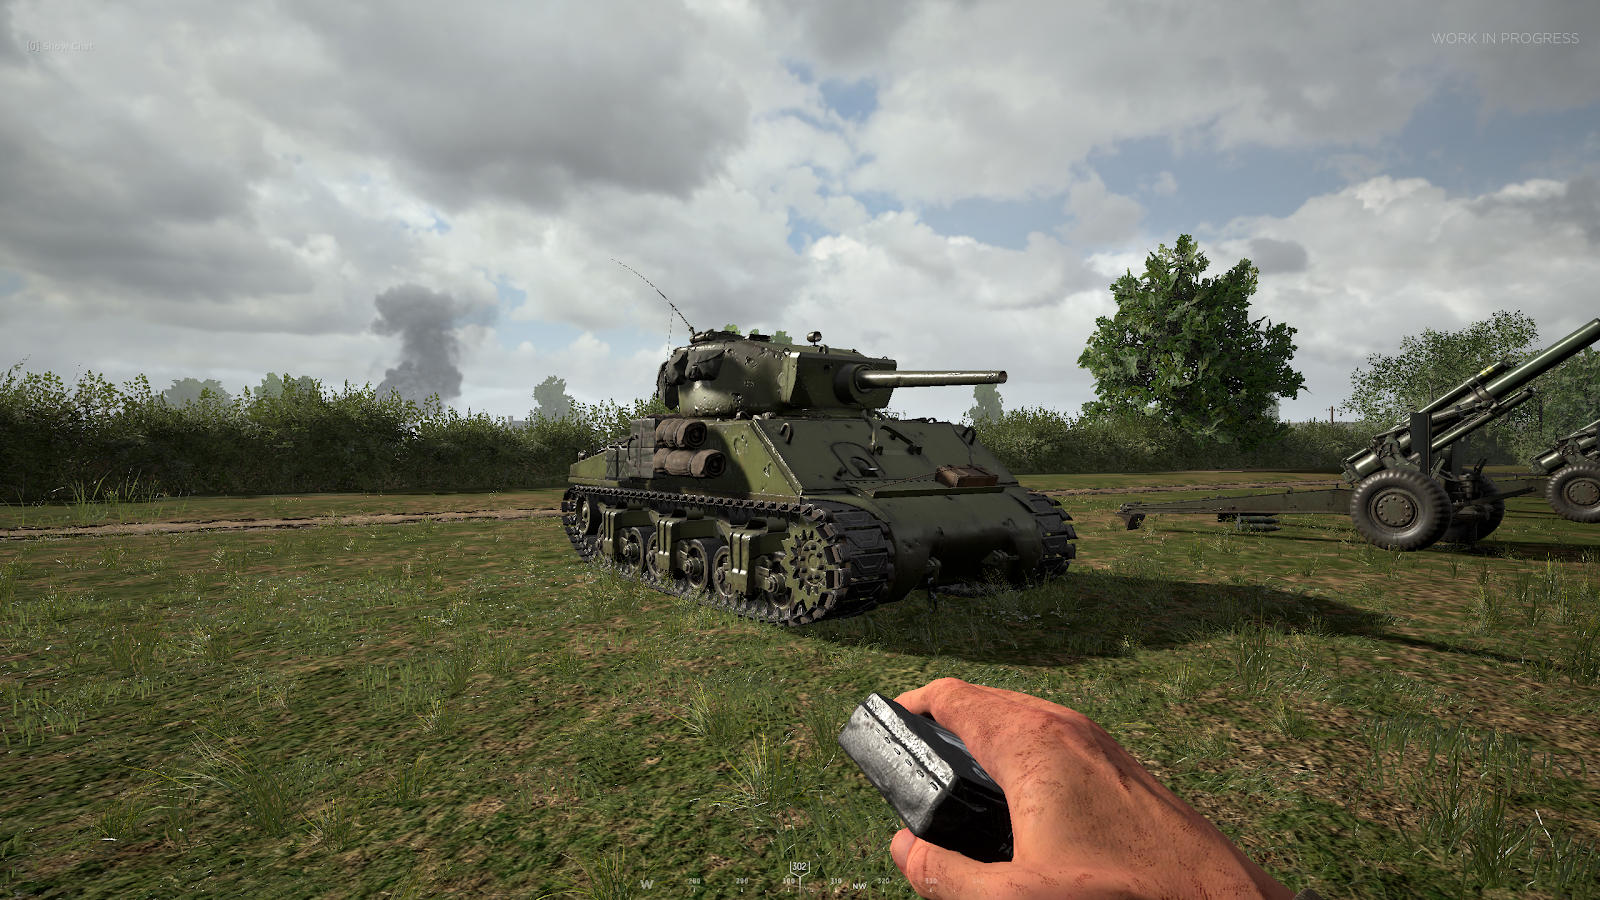
4.3 The M4 Sherman “Jumbo†75mm
The 75mm “Jumbo†Sherman, like its 76mm counterpart, boasts a thicker, more slanted front armor as well as a slightly bigger and much sturdier turret than it’s medium variant. It is equipped with AP, HE, and 8 rounds of a special smoke variety. These rounds can be used in a support role to precisely dump a large amount of smoke for a friendly push or obscure the vision of an enemy tank, among other uses. The greater tenacity as well as the support equipment allows this tank to fill a variety of roles on the battlefield, from infantry support to AOE lockdown and zoning.
So what does the 75mm Sherman “Jumbo†look like? How do you recognize it in the field? The 75mm can be recognized by spotting these features (Figure 9):
- The paint of the hull is a lighter green than other Sherman variants.
- The front of the hull is nice and tidy–no extra equipment is strapped to the front plate
- The barrel features no muzzle brake.
- The “Jumbo†variant of the Sherman can be recognized by its more boxy look and its slanted front plate, as well as the more sharpened edges of the body.
- The sides of the plate and the turret of the 75mm “Jumbo†both have a bunch of equipment strapped to them.
Figure 9: “Sherman ‘Jumbo’ 75mmâ€
Once again, here are the amount of shots it takes to kill various types of enemy tanks using the 75mm gun.
Location
Panzer II
Panther
Tiger
Front Plate
1
R
R
Side Plate
1
1*
2*
Turret
2
2
R
Back plate
1
1
2
Tracks
4
5
6
When engaging a Panzer II:
- Under rare circumstances should you shoot the tracks or the turret.
- Aim for the body, it is a 1 shot kill in the front, side, and back plates.
When engaging a Panther:
- Hitting any part of the front plate will ricochet. This is true for any angle, but sometimes you can get a shot that ricochets into the slit between the turret and the body for a 1 shot kill, although this is rare.
- If engaging a Panther head on where a side shot is not possible, shooting the turret twice will suffice. Care must be taken to avoid the barrel (as hitting the barrel will do 0 hull damage) as well as to aim for plates that are perpendicular to the projectile being fired in order to avoid ricochets.
- If an opportunity presents itself to shoot the Panther in the side, any angle that is too shallow will ricochet. About a maximum of 45 degrees with respect to the perpendicular of the side armor will allow you to 1 shot a Panther. Note that you must hit the portion of the side that slants towards the turret. Hitting the side skirt counts as a track shot.
- Shooting the back at any angle is a 2 shot kill. This is not recommended, as hitting the side is much easier and is also a 2 shot kill.
- Shooting the tracks is almost never the correct course of action when engaging a Panther, as it takes 5 shots to kill as opposed to the turret’s 2.
When engaging a Tiger:
- Any shots to the front of the plate, and front, side, and back of the turret will very likely ricochet. Even when they do not bounce, these rounds will not penetrate the hull and will do 0 damage. Under no circumstances should you aim for any of these parts.
- If you are able to get an angle on the side plate, you can kill a Tiger in 2 shots assuming your angle is at a maximum of 45 degrees with respect to the perpendicular of the side armor. If the angle is more shallow than this, you will ricochet.
- If engaging a Tiger tank head on, your only chance to do damage is to shoot it in the tracks (yes, you need 6 shots!). Because a good Tiger crew can still kill you with 1 projectile, it is advisable to attempt to disengage the Tiger.
- Once again, any shot to the back plate at any angle takes 1 shot to kill.
Opinion: In conclusion, the Sherman “Jumbo†75mm works great as an infantry support/anti-personnel tank that has greater tenacity than its Sherman Medium variant. The smoke rounds allow the tank to provide cover while the thicker armor lets this tank hold its own against enemy Panthers and Panzer II’s. That being said, the 75mm is still very vulnerable to enemy Tigers, and a good Tiger crew can still destroy a 75mm in 1 shot, while not letting you do very much to retaliate. If a Tiger is met on the battlefield head on, the optimal move is to disengage as fast as possible. This tank fills a similar role to the Sherman Medium, except that it can take positions that are slightly more risky thanks to the harder armor.
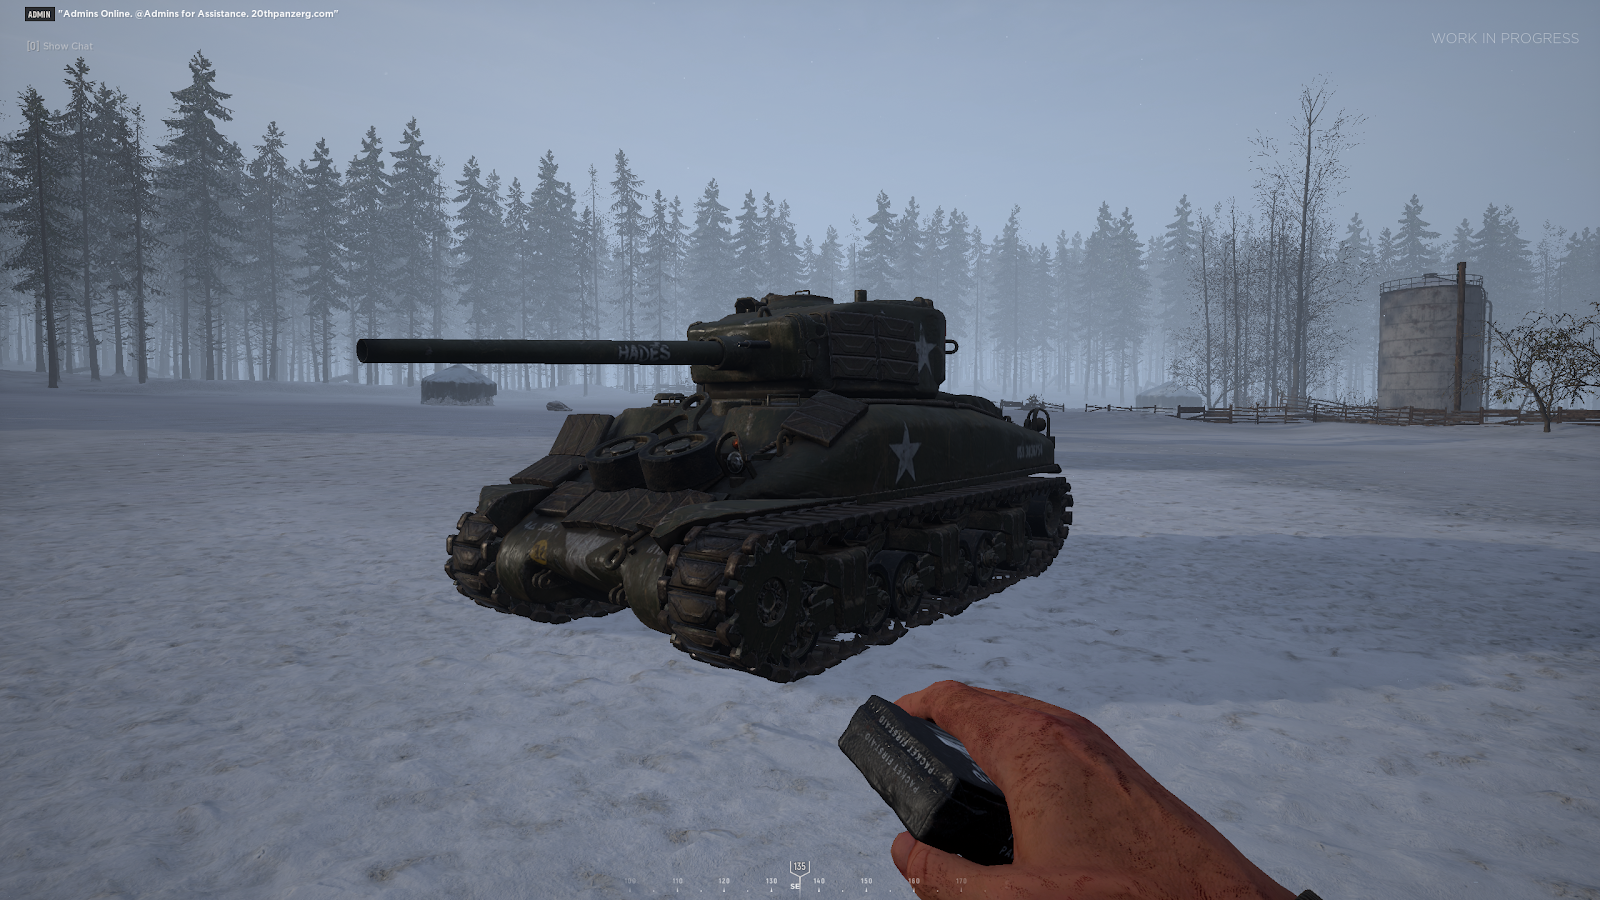
4.4 The M4 Sherman “Jumbo†76mm
The Sherman “Jumbo†76mm tank is the 75mm’s big brother in terms of firepower. The 76mm is the American answer to the impenetrable fortress on wheels that is the Tiger tank. While the armor is effectively identical to that of the 75mm “Jumbo†Sherman, the AP rounds fired are far superior. By all accounts, this is the heaviest tank that the Americans have to offer in Hell Let Loose.
        So what does she look like? Well, the 76mm can be distinguished from other Shermans by noticing the following features (Figure 10):
- The most important feature that is easily noticeable about the 76mm is the muzzle brake on the end of the barrel. No other Sherman tanks have this muzzle brake.
- The “Jumbo†variant of the Sherman can be recognized by its more boxy look and its slanted front plate, as well as the more sharpened edges of the body.
- The barrel is much longer than the 75mm or the Sherman Medium.
- There is a white star with a circle around it between the two tracks.
Figure 10: “Sherman ‘Jumbo’ 76mmâ€
Below are the amount of rounds required to kill various enemy tank types with the 76mm slugger:
Location
Panzer II
Panther
Tiger
Front Plate
1
R
2-4*
Side Plate
1
1
2
Turret
2
2
3*
Back plate
1
1
1
Tracks
4
4
6
When engaging a Panzer II:
- Only under rare circumstances should you shoot the tracks or the turret.
- Aim for the body, it is a 1 shot kill in the front, side, and back plates.
When engaging a Panther:
- most shots to the front plate will ricochet because of the slant. It is possible to ricochet shots from the front plate onto the turret, or even the slit between the turret and the front hull, however this is rare (try aiming for the hull mg sticking out of the front hull plate). Generally it is inadvisable to shoot the body if going for a kill, because the turret is a much faster way to kill a Panther.
- The turret will take 2 shots before the Panther explodes, and this can be done from any angle. It is exceedingly hard to ricochet the 76mm’s shells here, so just fire away! This method is great for killing Panthers that are facing towards you or that are only visible by their turret.
- Going for the tracks is inadvisable because of the sheer number of shots required to kill the tank. every other surface except for the front plate takes less shells.
- As with other tanks, hitting the back plate from any angle is a 1 shot kill.
- Shooting the side of the Panther at almost any angle will kill the Panther in 1 shot. This is arguably the best method of dispatching enemy Panthers with the 76mm if you are able to get the angle, because even if you can only see a small part of the side, it is still very likely that your shell will penetrate and kill the tank in 1 shot. That being said, your shells can ricochet if your angle is too shallow, but you have a lot of give to work with here (70-80 degrees from perpendicular). Note: you must also take care to hit the slanted part above the tracks, and not the side skirt that goes over the tracks themselves. This side skirt will count as a track shot and not a side shot if you shoot it.
When engaging a Tiger:
- This is where the 76mm “Jumbo†Sherman really shines. This is the only American tank that can actually pierce the front armor of a Tiger tank, and it can blow the Tiger up in 2 shots anywhere in the front hull plate. This is the go-to method for destroying a Tiger tank.
- The second spot that is very effective against a Tiger is the sides, which can be hit twice for a kill. The downside to this method is that at least some part of the side has to be exposed, and if the angle is too far from the perpendicular of the side armor then the shot will ricochet. The good news is that much like the Panther there is a lot of give here, and you can extend the angle to as far as 75-80 degrees from the perpendicular with no bouncing shells. This is a strictly inferior method to hitting the front, so only do this if you can’t hit the front for some reason.
- If for some reason the front and sides of the body are obscured or otherwise inaccessible, the turret is the next best place to hit. It takes 3 shots to kill instead of the 2 for the body, and the projectile must be perpendicular to the surface it is trying to penetrate. This means that if the Tiger is looking directly at you, the flat plates on either side of the barrel are where you want to aim, and hitting anywhere else will likely ricochet. Care also must be taken not to hit the barrel instead of the plates on the turret.
- Under almost no circumstances should you be hitting the tracks of a Tiger tank given the aforementioned methods of dispatching the tank, as it takes three times as long in the best case scenario (by that time you’d be dead).
- As usual, if you have an opportunity to hit the back plate, take it for a 1 shot kill.
Opinion: In conclusion, the Sherman “Jumbo†76mm brings a lot of firepower to the table on the American side. While the armor is the same as the 75mm, the bigger gun allows the 76mm to take on a more offensive role. This tank’s responsibility is to engage and destroy enemy tanks of all kinds, but especially Tiger tanks. Because all of the other tanks on the American side are put in more of an anti-personnel/support role, and because said other tanks cannot engage enemy Tigers with any sort of proficiency, this tank is left to do the job. It is important to note that while you can kill a Tiger pretty reliably in 2 shots as a 76mm “Jumbo†Sherman, the Tiger can still pretty reliably kill you in 1 shot. It is inadvisable to engage a Tiger if it has already engaged you or if you don’t have some sort of surprise advantage on it.
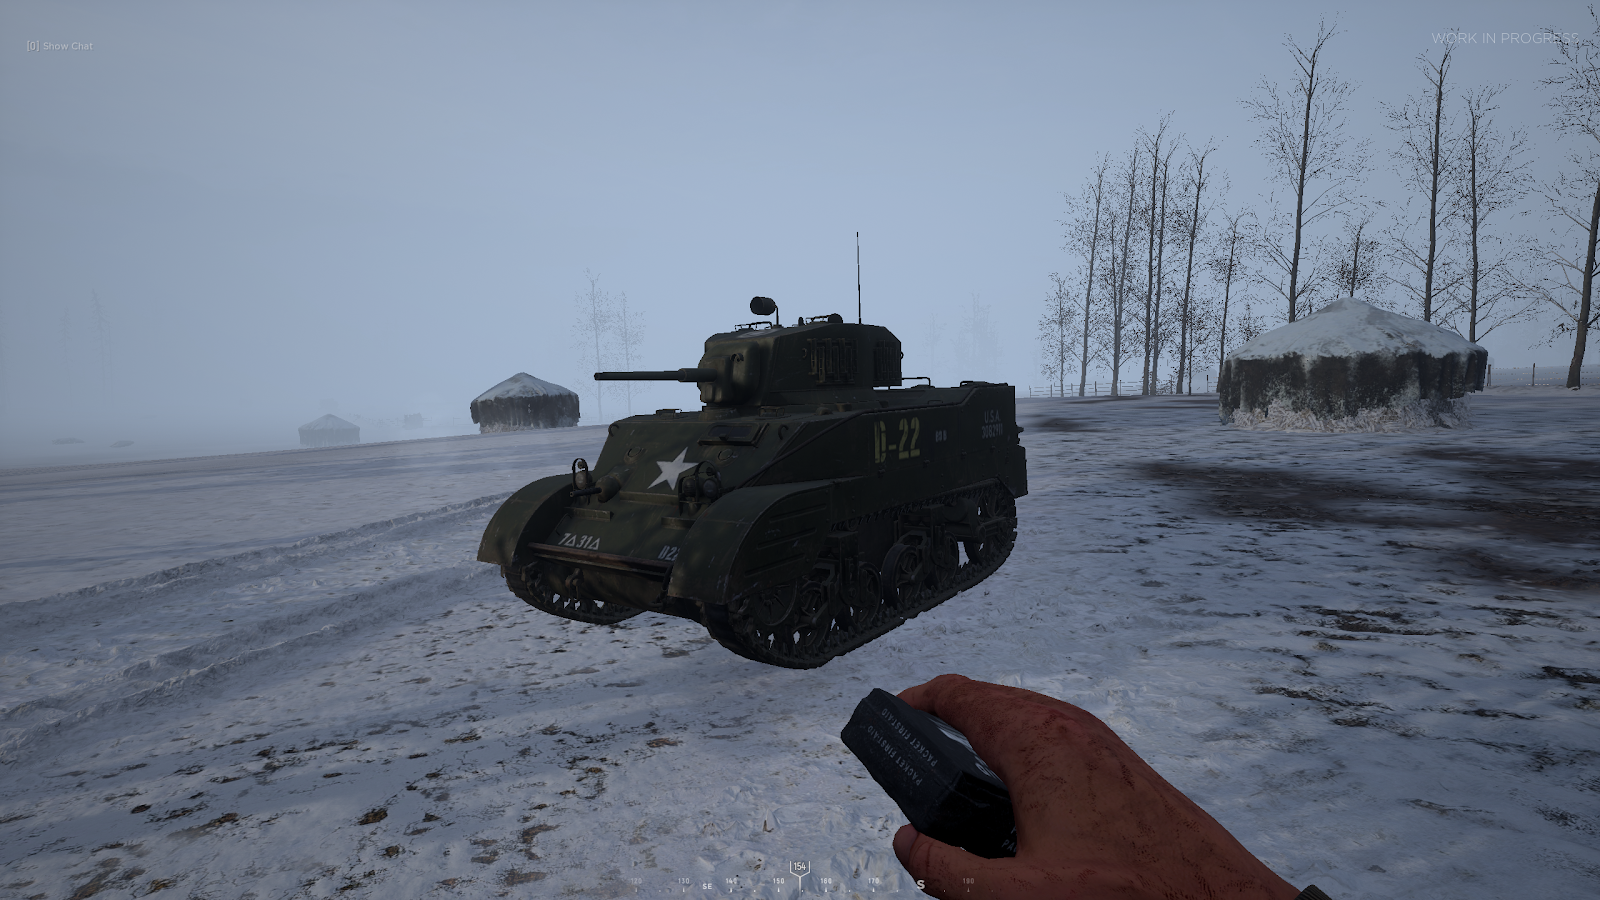
4.5 The M5 “Stuart†Light Tank
The M5 “Stuart†light tank is a small and mobile tank that can run circles around heavier tanks like the Tiger. Although its firepower is weak in comparison to even the Sherman Medium, its mobility and versatility allow this tank to rise to the top of a lot of veteran tankers’ preferences. Some claim that this tank can be used to great effect if in the right hands, and the validity of these statements will be assessed below.
        All that being said, what does a “Stuart†look like? The “Stuart†has the following outstanding features (Figure 11):
- A small overall build–this tank is one of the smallest in the game.
- The plate towards the back and sides forms a boxy shape behind the turret.
- There are curved plates over the tracks on either side of the front plate.
- There is a white star on the front plate.
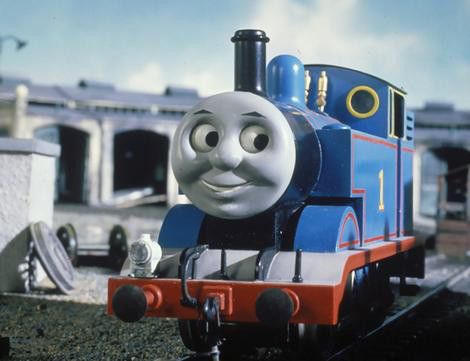
- It looks a bit like Thomas the Tank Engine (Figure 12).
Figure 11: “M5 ‘Stuart’ Light Tankâ€
Figure 12: “Thomas The Tank Engineâ€
Below are the amount of rounds required to kill various enemy tank types with the Stuart:
Location
Panzer II
Panther
Tiger
Front Plate
2
R
R
Side Plate
2
R
R
Turret
3
10*
R
Back plate
2
2
3
Tracks
4
10
12
When engaging a Panzer II:
- Shooting the front or side plates will kill it in two shots. This is almost always the best option.
- Care should be taken to avoid the turret and tracks if possible, as hitting these will take longer to kill the tank.
When engaging a Panther:
- Hitting any front or side shots will always ricochet. There is no reason why you should be aiming for these anyways.
- The turret can be shot to kill the tank in 10 shots, assuming you hit the turret on a surface that is perpendicular to your projectile to avoid ricochets. The tracks are a similar story (10 shots), except you can’t ricochet on the tracks. Obviously these are not ideal ways to engage Panther as a “Stuartâ€.
- It is inadvisable in general to engage a Panther unless you can see it’s back plate. The back plate will kill it quickly, but requires getting around it in the first place.
When engaging a Tiger:
- Any shots to the front plate, side plate, or front, side, or back of the turret will ricochet. Even if the shot does not ricochet, it will not penetrate the armor and thus will not do any damage to the tank.
- The tracks can be used to kill the Tiger, but only after 12 shots. This is not advantageous to do even if the Tiger does not see you or cannot otherwise see you. A good Tiger crew will figure out where you are and wipe you off the face of the earth with 1 shot well before hitting 12 shots.
- You should only engage a Tiger if you can see its back plate. With the “Stuartâ€s quick reload speed, you should dispatch it in a hurry.
Opinion: In conclusion, the M5 “Stuart†light tank is a very interesting specimen. Depending on your playstyle as a tanker this could be the best tank in the game or the worst. The “Stuartâ€s strengths lie in getting behind enemy lines and around enemy tanks. The incredible maneuverability as well as the quick reload speed of the “Stuart†lets this tank keep enemies on their toes. Flanking is the soundest strategy with this tank, as frontal assault against any other tank will get you killed 99% of the time. It should be noted as well that this is not a tank that should be used to sit in a position like the Shermans and lock down an area against enemy infantry. You have mobility, use it! A “Stuart†in the hands of a competent crew can wreak havoc in enemy back lines and force any enemy tanks to take more defensive positions.
4.6 The Panzerkampfwagen II Light Tank
The Panzer II is the light tank on the German side in Hell Let Loose. This little guy is equipped with a 20mm autocannon that fires HE rounds in a continuous fashion for a limited time until it has to be reloaded. Since it cannot fire AP rounds, it cannot do any damage to enemy Sherman tanks. That does not mean that it is useless however. This tank is agile and can put out a tremendous amount of anti-personnel firepower in a short time because of the autocannon’s continuous fire. Not to mention the fact that the Panzer II can kill a M5 “Stuart†in a pinch, if it can get an angle on the tracks or the back plate. It should be noted, however, that the driver for every tank mentioned up until this point, as well as the Panther and Tiger mentioned soon, all have hull MG’s as part of the driver’s kit. The Panzer II does not have a hull MG. With all that being said, the Panzer II’s small overall stature and fast speed allow it to flank enemy infantry positions and hide behind bushes and low buildings. Much like the M5 “Stuartâ€, you should always be moving from position to position with this tank, never holding any one angle for too long.
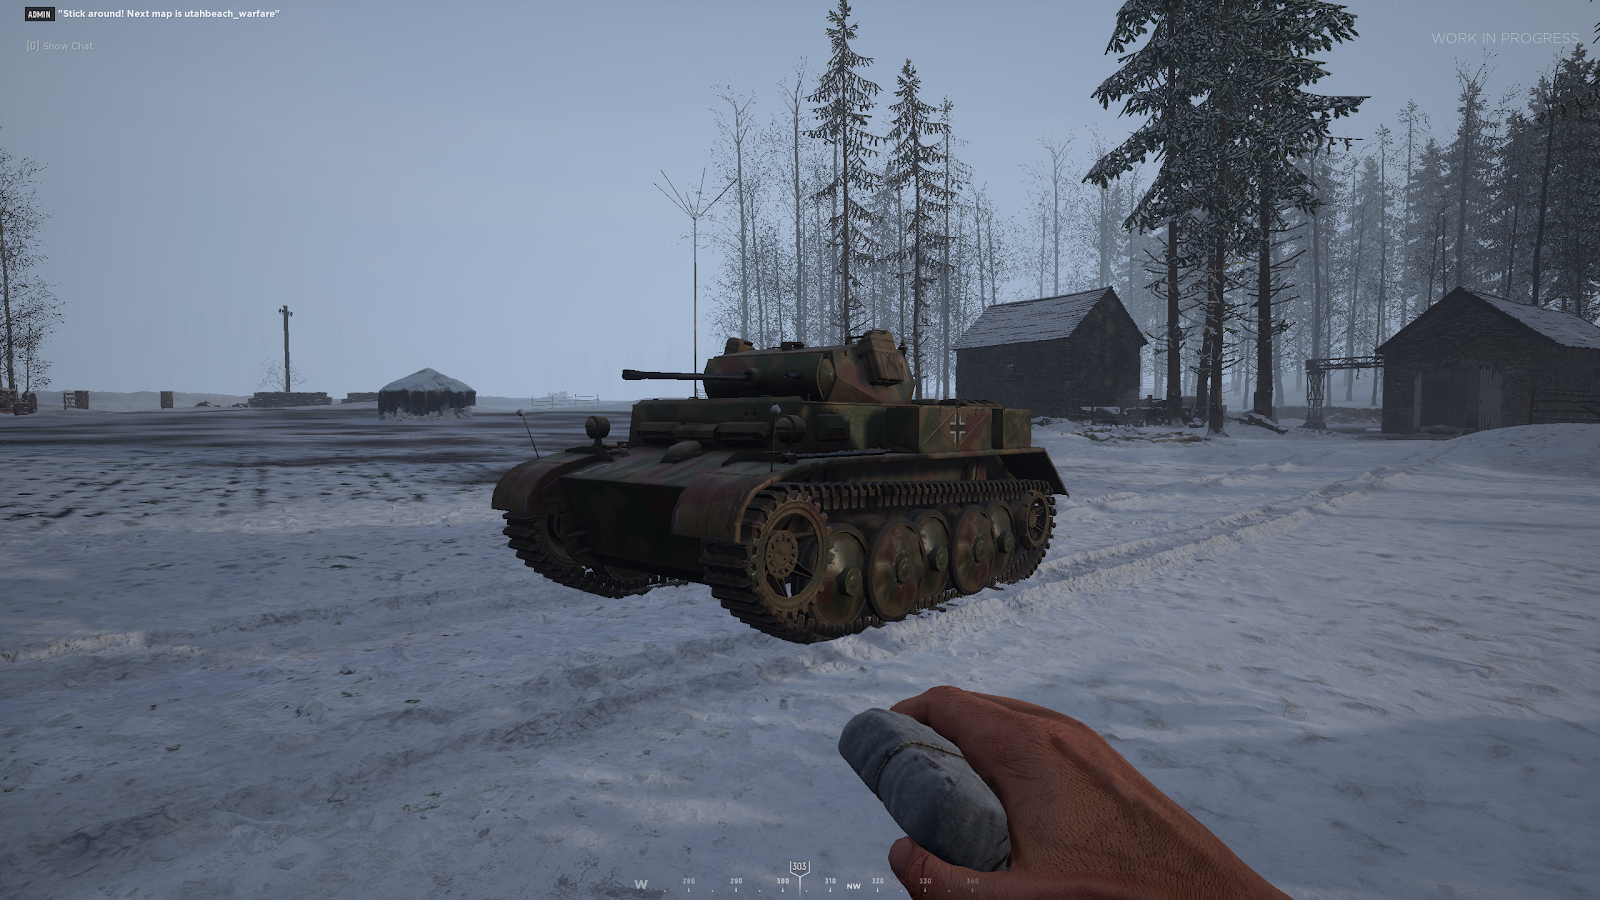
        “Ok, so it can’t kill me, but I want to kill it anyways! How do I recognize it?†Good question. Here are its defining features (Figure 13):
- A forest tricolor camo pattern on the hull.
- A really tiny cannon. We’re talking [EASY] Daps level pecker.
- A German white and black cross on its side.
Figure 13: “Panzer IIâ€
Below are the statistics for hitting American tanks with this thing:
Location
Stuart
Sherman Med
“Jumbo†75mm
“Jumbo†76mm
Front plate
R
R
R
R
Side plate
R
R
R
R
Turret
R
R
R
R
Back plate
3
R
R
R
Tracks
14
R
R
R
Clearly the only tank that is able to be killed is the M5 “Stuartâ€. When engaging a “Stuartâ€:
- Hitting the front plate, side plate, or turret at any angle will ricochet.
- Shooting the back plate is the best option, as it only takes three shots, and at the fast fire rate of the 20mm autocannon, this takes only a few seconds.
- The “Stuart†can be killed by shooting it in the tracks, however, this is inadvisable, because it takes 14 shots to do and must be at a maximum angle of 45 degrees from the perpendicular of the tracks to penetrate.
4.7 The Panzerkampfwagen V “Pantherâ€
The Panther is a “glass cannon†type medium tank on the German side. It brings high mobility and high firepower to the battlefield, with many slanted armor pieces that provide better penetration protection as well as an increased enemy ricochet chance when shooting its hull. When manned by a capable crew, the Panther can do a lot of infantry damage as well as hold its own in tank battles versus even the bigger Shermans on the U.S. side.
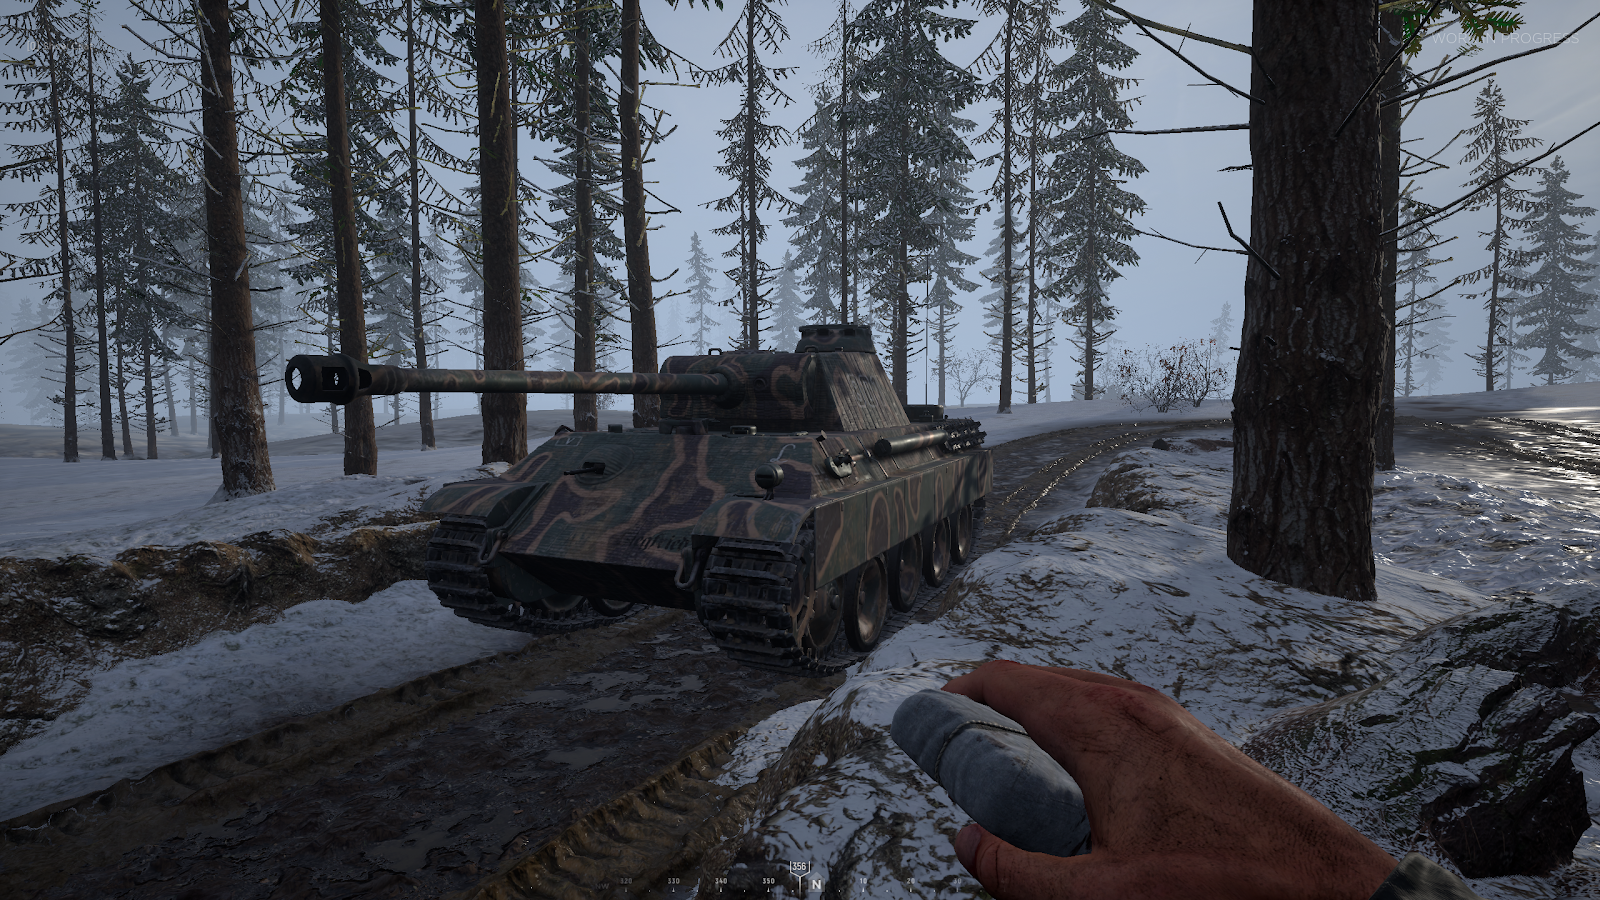
        The list below shows the unique features that can be used to recognize a Panther in the wild (Figure 14):
- A tricolor green/beige/purple camouflage over the entire tank.
- A very long barrel with a muzzle brake on the end.
- A thin side skirt that extends over about a third of the tracks.
- A slanted front plate two thirds of which slants towards the turret, and one third of which slants towards the grown in the opposite direction.
Figure 14: “The Panzerkampfwagen V ‘Panther’â€
Below are the interesting bits–the amount of shells it takes to kill enemy Shermans of various types:
Location
Stuart
Sherman Med
“Jumbo†75mm
“Jumbo†76mm
Front plate
1
1*
R
R
Side plate
1
1*
1*
1*
Turret
2
2
1*
1*
Back plate
1
1
1
1
Tracks
3
4
4
4
When engaging a “Stuartâ€:
- Hit it anywhere in the body for a 1 shot kill. Take care not to hit the tracks or turret, although it’s not the end of the world if you do.
When engaging a Sherman Medium:
- Shooting the front plate in the white star at the bottom of the hull is a 1 shot kill, however shooting anywhere else in the front body plate will ricochet, so be careful here. If you can see the star from where you are shooting, this is the best way to dispatch a Sherman Medium that is facing you head on.
- Shooting the turret twice will kill it, and is the close second alternative to shooting the white star on the front plate. This is because the turret is easy to see, and ricochets are really hard here–even hitting the slanted sides of the turret from the front will penetrate and kill the Sherman Medium in 2 shots.
- Shooting the side plate above the tracks for a 1 shot kill is also a viable option, but care must be taken that the projectile lands at a maximum of 45 degrees from the perpendicular of the side armor otherwise it will ricochet.
- Shooting the tracks is almost never advisable given the much better aforementioned options.
- 1 shot to the back plate at any angle.
When engaging a Sherman “Jumbo†75mm/â€Jumbo†76mm:
- Both of these tanks have the same armor, so the same tactics apply to both.
- Body shots to the front plate ricochet 99% of the time, and thus are inadvisable to aim for.
- The turret is the absolute best spot to aim for against the “Jumbo†Shermans, but care must be taken that the projectile lands on the top half of the flat portion of the turret either side of the barrel, between the barrel and the top of the turret (Figure 15). If you hit the top of the turret, side of the turret, or bottom half of the front turret plate, you will either ricochet or the shell will not penetrate. Note: some have claimed that this turret weak point is a bug. Whether or not this is true is not known, however for the purposes of gameplay, this area can be consistently used to kill “Jumboâ€s, and so it is mentioned here.
- Hitting the side plate is another good way to kill a “Jumbo†as a Panther, because you can do it in 1 shot only. The caveat is that the maximum angle to actually penetrate and not ricochet off the side is 45 degrees from the perpendicular of the side plate. The degree restriction makes this method strictly worse (but still an option) than the 1 shot to the turret.
- Hitting the packs on the left side of the “Jumbo†will kill it in 1 shot. This is true even if the “Jumbo†is facing its front towards you. Although hitting the packs is hard, the hit box (for some reason) allows a 1 shot kill from the front even though everywhere else on the side requires 45 degrees for a 1 shot (Figure 16).
- Hitting the tracks can be a viable option if catching a “Jumbo†off guard, but typically is inadvisable given that both “Jumboâ€s are able to dispatch you in a Panther a lot faster than you can them by shooting their tracks.
- Shooting the back plate is a 1 shot from any angle if you get the opportunity to do so.
Figure 15: “Where to shoot a ‘Jumbo’ Sherman for a 1 shot kill as a Panther or Tigerâ€
Figure 16: “The Packsâ€
Opinion: In conclusion, the Panther holds an interesting position in the German armament. Its relatively quick speed allows it to maneuver better than the Tiger or American “Jumbo†Sherman models, and its ability to outclass enemy Sherman Mediums in terms of firepower lets this tank take on a more aggressive role. That being said, it is also able to hold position and lock down enemy infantry in a zoning type tactic. The ability for the panther to 1 shot any American tank in the game reliably makes it a “glass cannon†version of the Tiger, and can be used to great effect on the battlefield. Overall the Panther is a balanced and versatile tank that can do a bit of everything.
4.8 The Panzerkampfwagen VI “Tigerâ€
The Tiger tank is a veritable fortress on wheels, with a main cannon that has the ability to wipe any tank in the game off the map with 1 shot. Its armor is extremely sturdy and it makes the Tiger an opponent that only the 76mm Sherman “Jumbo†can even try to come toe to toe with. That being said, the Tiger has a number of exploitable weaknesses that will be covered below.
        But what does it look like? The Tiger is unmistakable on the battlefield, and can be spotted by looking for these features (Figure 17):
- Size. The Tiger is the widest and longest tank in the game.
- There is a beige/dark grey camouflage pattern on the hull that looks somewhat like a tiger’s stripes.
- A very long main cannon with a muzzle brake on the end
- A front hull with a spiked section in-between the two tracks
Figure 17: “The Panzerkampfwagen VI ‘Tiger’â€
So let’s get a look at these juicy stats–how many hits does it take to kill those pesky “Jumboâ€s?
Location
Stuart
Sherman Med
“Jumbo†75mm
“Jumbo†76mm
Front plate
1
1
1*
1*
Side plate
1
1
1
1
Turret
2
2
2*
2*
Back plate
1
1
1
1
Tracks
3
2
4
4
When engaging a “Stuartâ€:
- Hit it in the body, otherwise you’ll waste your time.
When engaging a Sherman Medium:
- Again, even though you completely outclass the Sherman Medium and the only way it can even come close to killing you is some acute side shots, don’t waste your time. Shoot it once in any part of the body for an instant kill.
- If you for some reason can’t hit the body, shoot the turret anywhere twice for a kill. Ricochets are hard to do here, so don’t discriminate.
- There’s really no reason to hit the tracks, but it should be a fast kill if you do anyways.
When engaging a Sherman “Jumbo†75mm/76mm:
- You can kill these tanks in 1 shot in the front plate, but you have to hit the rounded portion of the front hull towards the bottom. On the 76mm this portion has a star on it that makes it easier to shoot. If you do not hit this area, the round will likely ricochet for no damage (Figure 18).
- Another very viable 1 shot kill strategy is aiming for the side plate. Even if you can see only a relatively small portion of the side plate, it is advisable to shoot at it because the Tiger round is powerful enough to penetrate at a shallow angle. Note that this does not mean shooting the side is foolproof–you can still ricochet if you are extremely shallow, though this is rare. The angle is approximately 75-80 degrees from the perpendicular of the side plate.
- Important note: The difference in cannons between the 75mm “Jumbo†Sherman and the 76mm drastically changes the urgency of the engagement. The 76mm can kill you in 2 shots almost anywhere, but the 75mm cannot penetrate your front armor or turret. This means that you can take your time when engaging the 75mm “Jumbo†and don’t necessarily need to aim for the 1 shot body kill and risk ricocheting. On the other hand, it is imperative to land the 1 shot body kill on a 76mm before it can cripple or kill you.
- Shooting the turret can be a 1 shot kill if you aim for the top half of the front plate of the turret, on either side of the barrel. This is a slightly inferior method to firing on the lower front body of the “Jumbo†because it is a smaller area and thus harder to hit, but if the body is obscured for some reason, then this is the next best method. Note: If you miss the top half of the front facing plate of the turret and instead hit the bottom half, it will take 2 shots instead of 1. If you hit the sides of the turret however, the shot will likely ricochet (See Figure 15 above for where this spot is).
- Shooting the packs (Figure 16) will 1 shot kill the “Jumbo†even when the “Jumboâ€s front is facing you. Same story as the Panther.
- Of course, 1 shot to the back plate at any angle will kill it.
Figure 18: “Where to hit a ‘Jumbo’ for a 1 shot killâ€
An important note on the Tiger’s maneuverability:
The Tiger takes a measurably longer time than other tanks in the game to make a full stop when moving at fourth gear and take an accurate shot. The Tiger takes around 5-6 seconds to stabilize when the driver makes a sudden stop, as opposed to American tanks which take around 2-3 seconds to stabilize on full stop. Obviously this is a weakness of the Tiger, as enemy tanks can get a shot in before you even get a chance to acquire the target. This can be mitigated by dropping to third gear and in some cases second gear right before hitting the “S†button to stop the tank. This lets the stabilization time of the Tiger drop to 2-3 seconds like the competition.
Opinion: In conclusion, the Tiger is an absolute beast of a tank. If the crew of the Tiger is competent, they can deal with anything the Americans can throw at them, all the while decimating enemy infantry. The main role of the Tiger is two fold: first, to seek out and engage enemy tanks to keep them off friendly infantry, and secondly to provide an impenetrable defensive position against advancing enemy infantry/armor or to provide mobile cover and covering fire for advancing friendly infantry. The Tiger is perhaps best suited to sitting in a position and locking down a zone against enemy tanks and infantry in order to force the enemy to spend resources to get you to leave or attempt a different route of attack. This is especially true since the Tiger’s maximum movement speed is quite slow, and as mentioned previously the stop speed is also slow. In order to maximize the value from a Tiger, it’s best to find a good location and start shelling.
5 Â Â Conclusions
If you’ve gotten this far, I want to thank you for reading this rather lengthy document. I hope you’ve at least learned something interesting from my hours of sitting in empty lobbies and grinding tank stats. I also want to thank [EASY] Styker for helping me out with a lot of the tedious testing. Hopefully this information lets you destroy the competition next time you join an armored squad. Thank you, and good luck!
-
07/11/2020 at 11:34 #55724
Really great post m8!
-
08/11/2020 at 12:17 #55803
Really great find
-
08/11/2020 at 13:13 #55805
I have made more compact guide/summary for those who dont like long reading or dont have the time. It can be found here:
-
09/10/2021 at 12:21 #75385
The Tank bible has been updated, the link was shared in discord couple of weeks ago. But better have it also on the forum. Good but long read.
-
12/10/2021 at 08:37 #75501
Great Thread. Thanks for the tips it will help a lot.
-
-
AuthorPosts


- You must be logged in to reply to this topic.